2012년 5월 30일 수요일

Turn over

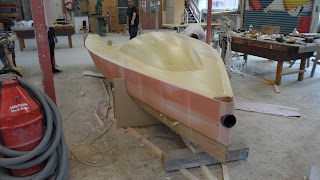
We turn the boat over.

Lance is still sick and I had to take buses this morning. Andrew was filling the gap ground by diamond grinder, when I arrived at class. Make sure not to grind to deep so that can touch or make a hole on coving underside of the deck.

This is what fuller is going on and looks almost finished. One more layer of EDB is needed.

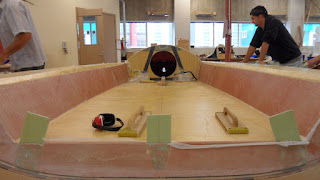
I went into the cabin, taking a photo looking towards to hatch.

Coving between the bulkhead and the floor

Coving underside of the deck edge and that lump is glue gone through the coving from gap filling.

Towards bulkhead

cockpit bulkhead. nice fitting.

The bulkhead went on to right on the centre of the floor. That gap between the centre case and the bulkhead will be blocked by a part of girder later on.

under the flange

Where is this?

We started destructing frames.

How are we going to finish this front part?

Messy. We have to do planing, sanding, fairing and another sanding. Chris said it will take a day.

We have nailed the lofting nail through the foam to the frame to get the right shape but it wasn't good for destructing the frame because it harmed the foam. What else way can we choose to get the shape of the topside?

We demoulded all but three frames.

The bearer.

We need certainly enough people to turn over so Chris asked the other class to help us. We had Q&A time about this boat, which was quite nervous for me. It is a good chance to see a flipped over boat not being finished yet.

belly up

She has got a chine but it isn't quite distinct in this picture.

nice shape

from behind the transom

The left one is what is going to be between centrecase and bulkhead, part of the girdier and the right one is a jig to profile the deck edge by a certain radius.

2012년 5월 29일 화요일

Deck Hull Joint


Lance didn't come today because he was sick so I couldn't get a ride to school. I was late. We joined the deck and the hull together.

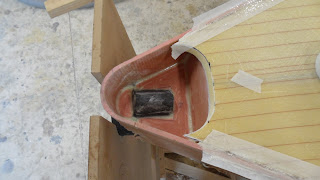
This is what I did yesterday but looks ugly. It was all good until the carbon laminating but working after getting this tube into the prow was not easy. Most of sharp bits have been sanded because this part is going to be exposed later on.

Classmates and Chris was preparing all stuffs to get the deck on wearing those dust proof suits. We peeled unpeeled peel ply and sanded joint part and clear up part beyond the bulkhead.


We didn't peel the peel ply in front of the bulkhead because we can do that anytime getting into the cabin.

Nice.

I made two pieces of foam for preventing the water coming into prow. I did trial and error and got the shape. Sketch on a piece of cardboard, fit them, trasfer them onto a piece of foam, fit them.


This part is so solid. It won't go anywhere. The hull might rather being worried. I am going to laminate one more layer of glass on this on the coving.

We put some pieces of wood just below that line to support the front deck, otherwise it goes down by weight itself. We used hot glue gun.

We used west system this time and they are putting the glue in proper thickness.

We used some wooden jig to get the deck down to sheer height. Make sure try to push it gently.

Resin from the flange against the transom.


We can see resin coming out from transom.

To push the transom forward, we used similar method to the jig on the deck.

We set these plank up to get enough weight, roughly 20kg each, on the bulkhead, using reasonably thick ones. We put one more on outboard to push the transom down. We have to make sure not to push too hard so that resin inside squashed or not to repeat pushing and releasing.

We are going to cut that front part for the fuller.

Ogi and Tristan cove inside front side of the deck underneath as well as this part between the bulkhead and the floor. They also did a little gap just behind the bulkhead. How are we gonna get that hatch on the centrecase.


We filled the resin into the gap which is pretty big(good). West system was already gone off. We are going to mix it quite runny to fill the smaller gap, or even grind with using diamond grinder to make the gap bigger to let the glue in.

Do the other job tomorrow, turn over next monday, laminate on tuesday then it will finished I reckon.

2012년 5월 27일 일요일

dryfit the deck

We dryfit the deck and I carried on the prow tube.

It was Lance I think he did this little bit last wednesday.


Turned over.


View from bow starboard

Andrew bored holes on each side to get the stanchion through


It doesn't seem on this picture but Lance ground top of the girder for the little plate on outboard on the deck. The centre case hole on the deck has to go back by 10 mm.


The forward face of transom has to be against the aft face of flange, but they aren't. Deck has to be back as well as the stanchion hole.


It looks not too bad, but we need another 10 mm anyway.


This is what I took a shot from just inside hatch looking down to the floor to see if the bulkhead is on it. It sat just on the edge of the floor but it will come back a bit and is going to look better.


To make the hole bigger by 10 mm forward, we had to grind the boombang plate out. Andrew used a jigsaw.


She fit into the hull at last. Check any lumps or obstacles, get rid of them. It looks like the deck couldn't go down because of the edge of the transom each side. Cut it anyway.


We can see the light through the prowtube.


This is cross sectional sketch to think about how we cut the edge of the deck and how we bevel. We first line up the centre line fore and aft, dryfit, draw lines on the edge on each frame. Take the deck off, take the measurement from the edge line to the line of the topside inside, add 1mm and mark it. Put the deck on, trasfer the measurement on the deck on each frame, use batten, draw a fair line, cut it.


One nice fair line


Chris demonstrated cutting the deck at first. Give the jig saw certain bevel angle and cut the deck off. Make sure to make the angle plumberer as it goes to bow.


He did like this.

Chris said that we will use this offcut to make hatch somehow.


A half hole for the stanchion.


It fits well now. There was a bit of gap portside but that is alright. We might use adhesive powder for the joint.


Lance is looking at the gap. It was a bit bigger than I supposed.

This gap will be filled with glue.


Ogi and Lance are sanding off the bottom of the bulkhead.


This corner is a little bit high. We should have thought about the coving underneath the deck edge. Cut it out anyway.


Looking good.


The topside edge is a bit higher than the sheer line which is same to the height of frames. We probably are going to make a jig to adjust the height. If it is a bit lower, use a lofting nail inside. We have to make sure to keep the camber angle with proper sheer height. I couldn't take photos of my prowtube job. I cut two pieces for forward face of bulkhead going around the tube, three pieces to laminate aft face of nosecone one of which went underneath of the tube. Be aware of the peel ply not going under the fibreglass. Is there any way to do this tube before it becomes hard to be done.

gloss
matt
fetch
athwartships