2012년 6월 20일 수요일

Anchor locker but no anchor

We weighed and laminated under centrecase and deck joint, anchor locker.

We weighed in the morning. Those scale bars has 1500kg weighing capacity each.

It is 116kg but this figure is not considered about bulb, rigging, painting which has to be added later on and excess resin on peel ply which has to be taken out.

Sweep stake!

Centre case view from top

That little girder bit infront of centrecase is situated finally. Job inside of the boat has completely finished and we've got to make hatch cover.


Andrew is making hatch reinforcement bit going inside cabin top against the hatch. Put that around the hatch and laminate over all around inside and outside.

Woven fibre glass. This is going to be laminated in anchor locker finally, which doesn't have binder so that is easy to be shaped.

We have got to cut that extra bit. We filled the gap between deck and the case as well as the gap between coving below and gantry tubes. We made thicksotrope light so that goes into the gap easily with using a syringe.

like this. That wire is a piece of MIG weling stick used to get the airpocket out of the resin in this time. We put some resin into the tube to fill the gap between the joint below as well.

to let the glue in easily.

resin with powder mixed lightly

Tristan playing his guitar on the boat.

It looks nice. I chopped peel ply into small pieces to fit in this space. It looks flooded but good anyway. Chris said that this part can be a natural handrail for people because there isn't any thing to grip somewhere on the boat. He was thinking of putting another layer of carbon uni acrosse that section.

Andrew filled the gap which has been through the carbon.

Dig the foam out on the edge and fill it with thicksotrophe to stiffen the edge and prevent de-laminating.
 

Stiffener being going to be behind the hatch.


nice.

2012년 6월 18일 월요일

Last turning over

We finished making splashes and turned the boat over eventually.


In order to do some extra work on the boat as well as to fit in exact position, we made temporary spalls supporting the legs.


Lance is taking the centrecase plug out with a piece of wood and a hammer smacking on the wood.

Install the other ones diagonally as well

Turned over. Those extra bits has to be cut with diamond saw later on.


Chris explained us about moulding. It is a bit unfamiliar, I have worked for mackay boat for a while though.

Gel coat has such a porous surface so we put chop strand mat on it. Peel ply is made of open weave deklon and coated with teflon. That's why it is peeled off easily.

From above.

Chris introduced this material which is good for making moulds. It is solid and is low shrinkable but expansive.

Andrew is cutting the extra bit.

Tapu is sanding the prow tube flush to nosecone.

We used contact adhesive to put the blue foam and splashes together. Put some glue on the surface, wait until it becomes as tacky as not sticking to fingers. It can't be re-attached once it is stuck. Lance said that pre-preg material is so.

completed splash

Put the splashes on the floor, turned the boat over and sit her on the splashes. We finished structural job.

We are talking about how the boat is. Workers' movement or things like that has to be considered to  sit the boat in which way in workshop.

Taken from upstairs. Quite wide.

a nice and lean body


Make splashes

The concavity wasn't too bad that we checked this morning but it needs something to be done anyway. We laminated inside deck for reinforcing the chain plates and laminated splashes.


It was so good experience.

We can't see the hollow in this picture but it has actually. The depth of hollow is equal to the sum of force of vacume and topside and the air coming through the hole Ogi drilled on the bulkhead. It is cured as the shape with every force equalised. There is a vertical crack on the foam but the resin smeared into that and fixed itself.

Dryfitting the leg of the splashes, we coved on each corner with a special kind of polyester containing carbon fibre and aluminum powder and laminated with one layer of CBM and two layers of EDB on it. The resin has to be rich when laminating.
 

It is an activation curve of polyester. Chris drew this and I didn't believe that the temperature goes up to 100 degree but I touched the ice cream contaner today and it really is as hot as 100. Pot means working time that the temperature doesn't go up meaining that the resin doesn't cure. The pot length and the gradient depends on the room temperature and the amount of catalyser.


This is what we used for the coving on the splashes. It is usually used by builders because it isn't quite proper to make a boat. The catalyser of this has to be under 3% and even 2% was quite fast to be gone off as we had about less than 20 minutes of working time. If it goes above 5%, it goes off when mixing.

The color is seemed to be silver because of aluminum powder.

I found a model dory inside of our dory.

Sanding a bit.

We had an experiment to see if this pet squashes when it is all covered or either it is covered like this picture. The result was 'no'.

Hand laminating.

but if there is a hole on the pet, it implodes like that, which is same to our boat imploding this time.

bulletproof
thicksotropes
every now and again
outrigger

2012년 6월 13일 수요일

Bugger


Topside imploded. We made pads of the splashes.

We peeled every stack off.


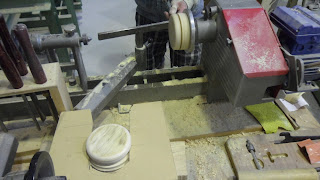
We made a temporary gauge, which looks like a vernier callipers, for measuring diametre for plugs fitting on the prow tube. We used lathe for making those blocks.


We laminated those pads for splashes with polyester and 3 layers of CSM one of which is thicker than the others and 2 layers of EDB.


I missed Chris's explanation about polyester because I prepared the last laminating of the bow.

That black knob at the top right side of the picture has to be released always, otherwise the motor inside could be burned accidentally. There is our temporary measuring diametre at the bottom right.


Don't go too slowly. It burns.

We finishe this up with using a piece of sandpaper putting on when it is still spinning.


This is the polyester resin we used today. The ratio of the resin and the catalyser is 100:0.75 when the temperature is high(in summer), :2 when it is low(winter). If the ratio of catalyser is lower or higher than the range, it won't cure. MEKP(methyl ethyl ketone peroxide) the catalyser melt binder of CSM and the gas when it is activating is bad for human. It is heavier than the air.


Those metal rollers are good to push CSM down when laminating.

It turned green the color which comes out when they are reacting.


Brush it roughly with quite enough resin.


Chris said that the part where has an air pocket doesn't cure I'm not sure he said like that though.

We've got 'only' 2 weeks left but we had an accident today. The topside at the bow has imploded by laminating in a wrong way.


I drew some sketches for the last laminating. That lap on top moved to front to work easier.


Not bad so far


But that bottom right picture has to be changed into the picture below at the bottom right to make sure it works even if there are holes in the anchor locker.


I felt so sorry to my companions and Chris that it was basically my goal today. It is worse that we are in the last steps. I hope that will be fixed somehow.