2011년 11월 29일 화요일

29112011(getting finished)


My task yesterday was the forward bulkhead camber which was actually not my one so far. Before doing that I was sanding bits of bid and nothing else. Anyway, I could find the plank for that glued the day before. I have thought for a while and asked Vaughn the magnificent and thought again bit a while again and made it. The way I should have made is that I sand it down just one side (I sand it down with a big belt sander, sanding both side and had to be aware of the thickness of each layer). When I was using the belt sander, the plank kept being stuck in it, maybe because I didn’t turn the suction switch and actually I don’t know how to turn on the extractor for it. It has an automatic extracting system but sometimes I had to switch on the motor on the right side of it. As well as this, the paddle for measuring thickness didn’t work either. I have to know these. I used a trimmer yesterday and a router today for rebate for the camber. One tricky thing to mind is that the camber is somewhat stiff forward because it is narrow and rebate angle has to be changed that part. Before coming to this stage we would have thought about this. Definetely, next time. Dry fit, adjust and done. Make sure get the faying surface wide enough. We did a mistake of crit(?) as well. It was too long and the bulkhead banded to aftward on the top, so the door for it didn’t fit in. We cut it and used a wedge which was white cedar same as the stem. Thwarts are all right now. Make sure they don’t sit on the wall and push it out. They have to be sat on the risers. Using bend saw downstairs today, I realized that it is pretty hard to make detail like circle or things like that in just one cut. I almost cut the planking. Cut roughly with it and use another machine (sanding) or by hands. Mind it. Buzz, Tapu and I talked about surf board today. Row lock chock is one thing that I learned today. They may be in the middle of each thwart. Find the most spot to let the fishing rods be. Learning how to use coping saw and the purpose of it, I was heard that when sanding follow the grain. White cedar is not really hard and strong wood, which means that it is not hard to manufacture. Quarter knees’ arms are better to be thin rather than being thick so that break when the sheer strakes changes. We made two sanding sticks which looked like women’s nail bar(?) or something and is supposed to be quite useful. We can even make a bevel for using it in different angles. To fill the nail holes, we can use masking tape after fill them with glue. Bear tomorrow.


Ruthless

Reakless

Tender

2011년 11월 23일 수요일

23112011(Interior)

Terms

Inwale(doubler)

Dove tale saw

Spall

Roll lock chocks

Fair lead

Centre girder


We made risers for thwarts. First, we had to decide where they put on. They are on AutoCAD drawing but if the boat owner wants in another way, we have to follow that. One forward thwart of Moira’s boat needs space for a mop bucket between the thwart and the bulkhead. It was roughly 250mm that we reckon. To make risers fit in situ was a bit tricky because of the shape and the angle inside the boat. It would have been good to make each set of them as similar as possible. Now I am thinking about the way that we made them in proper angle, we could have used bevel square with straight edge or something like that (what is the name of the tool that indicates the right angle and horizontal with green water in it?). I used the same method that we tried to fit the skegs onto the bottom, I don’t know if that is right or not, which is quite fit though. Lance and Elvis were lofting thwarts and waiting for pattens. I kind of couldn’t understand why they need and how they work, but at the end of the day they are needed because it is more accurate that using pattens rather than just measuring from AutoCAD which is hard actually. Making pattens are not pretty hard but we had to make sure drew a line on the pattens of the thwarts going in, but again we had to measure the distance on the centre line, not on the chine line. Anyway, we sat them in glueing with hot glue gun for temporary. Because of making the patten based on the chine line we had to think about how much we have to bevel the thwarts. Chris showed us how to do that with bevel square. One thing that I thought about is the sequence of making the pattens and fitting the bulkhead in the situ. We used a spall for make the width of boat original as it was on the temporary frame. It doesn’t really matter but I thought it would be more efficient that glueing the bulkhead before making them. Thwarts have 3 solids and 2 gaps between them. Outer solids follow the chine line shape and the width of the middle ones are even for the forward thwart, the middle one and the aft one. It depends on how to dress the wood or which people do the machine, that how much margin the wood need to be had but for me it is 5mm. So if I am aiming 50mm thickness of planking, I have to make them 55mm before sending. Always make them bigger enough to dress. Jib’s task is bulkhead and I picked up how to make it but it is not all. The bulkhead needs to be beveled off. I finished making my tools (tool box, oil stone box and long board) today. For making sure that the thwarts don’t move after glueing up, we used nail method the same we did when we were making our tool box and nailed on both sides of each solid. Epoxy gets hard when it is not spread, which means that it doesn’t meet the air. Weird… The grain for the foredeck has to be longitudinal direction of the boat, which can be easily bended round transversely. I don’t know how to make the foredeck. I missed the whole thing since I did inwale of the transom. I made it with dove tale saw to make perfect joints, saw, chisel and sand paper with a right angled wood to make the mitre(?) joint. First thing to do is make a rebate on the frame attached already on the transom. Then measured and drew lines for fitting the joints. Make rebate on the inwale. Set in situ and cut off the rest of it. I missed how to fit the doubler for the bulkhead in situ, which was really tricky (I totally couldn’t understand.). We also made quarter knees for one boat. Actually, we were making for both but it cracked, which was kind of hard that control the bending timing between cool down and breaking.
Now we've got only next week left.


Mast

Kevlar

Carbon fibre

A material that looks like honey comb

2011년 11월 17일 목요일

17112011(Turn over and beer)

Vaughn the magnificent have had us this Monday. We glued up sheer strakes and skegs at the end. Brass nailing seemed quite hard without using dolly. Stem, my task, hasn’t emerged yet, because it is under the planks that I would planed off later. My long board glued last Wednesday looked okay. I reused a piece of off-cut which is 12 mm plywood. One achievement we got today is that we figured out how to push the planks against the temporary frames. We started to talk about that with using long piece of woods nailed on the temporary frames and sort of complicated method but we found out quite an easy and neat way to push them, it doesn’t hurt the planks as well. First, nailed a long piece of wood firmly onto the frames and make a groove at the end of each piece to hold another piece of wood for pushing wedges against the planks. EZY. After, arrange them the only thing to do is pushing until the glue comes out. We used only 3 cramps to hold sheer strakes.


The method we found worked well checking next morning. Starting with sanding the glue off, I kept doing the stem. Planing the glue off is much harder than planing the wood. We used glue enough to fill the gap between here and there, but it was too much somewhere so that planing was quite hard. To make gunnels, Chris showed us a jig for them and how it worked. Buzzer, table saw and thicknesser were used. To make the skegs round, we used router. There are a couple of gaps on the planks which are usually between two planks at the edge of faying surface. Chris showed us how to fill them up without any messiness with using masking tape driving both sides of the edge, glueing and taking the tape off. Simple. Stem is getting its shape with taking off the glue and planks covered on it. Prior to glueing the gunnels, we decided to have them into steam machine, because they were too stiff to put directly on the sheer strakes. It took about 1.5 hour to boil the water and 15 minutes to steam the gunnels 15 minutes to be cool down for taking a shape. Before doing the steaming, we measured how round it is, checking the heights from both ends to the bottom. So many cramps were used for holding the gunnels on the planks. We made small bits of wood to protect and to hold the gunnel firmly. Anyway, we have to keep thinking about how to protect the boats and how to work easier and more proper.

One thing happened on Wednesday morning was the skid was 7mm off to the centre line. Forward part was okay but it shifted aftwards. We were told that we can learn by making mistakes. I thought that it wouldn’t really effect on the stability or the maneuverability of the boat but for the future we have to think about what was the mistake and how to solve it. Think before I do. Think while I do. Think after I have done. I should have taken a picture written on a white board by Chris. Anyway we have to take the skid off by sawing with two flat thin sheets of wood for protecting the boat rather than using a grinder. It was felt like a punishment or things like that. Otherwise, we could turn over the boat that morning. It took for whole morning to take the skid off, sanded the glue on the bottom, chiseled, made another skid again and fit it. By the way, Jibreal brought some doughnuts for us from a bakery which one of his friends set up. It was delicious. Stem is looking good so far. Anyway, we turned over Moira’s dory, but before that we had sweep stake for guessing the weight of the boat. I guessed 30kg and bet 1 dollar but it was 31.5 or something. Actually, a temporary frame for station 3 was stuck with the boat and it took a while for taking it off. We used wedges and a hammer. Additionally, I made a handle for my long board. I used off-cuts for making it three pieces and assembled it with glueing each other. We had a time with boat owner’s husband who is Chris, my teacher, to hear about the concept that normally he is going to use it for fishing. He told us about thwarts, risers, quarter knees and bulkhead. After the class, Chris and us went to Carrington and had beer. I told him about what I did last vacation and what I am going to do in the future. It was really good time, the weather was even good as well. Choice!

2011년 11월 10일 목요일

sweepstake

rice puding

11112011(box and land joint)

There was a reason why the line of the first plank didn’t follow the edge of each frame. This plan was from U.S. and their drawing is normally for outside measurement and this one is so. For changing into New Zealand style it was simply deducted 6mm of its thickness but that didn’t work. Anyway, it isn’t really a big deal at the moment, because we’ve got much bigger surface for faying. A team glued afterwards skegs but we didn’t. We tried to set the topsides in situ but it was 4 P.M. when we were ready for doing it, so we delayed doing that to next week.

Leave 1 mm gap considering the thickness of epoxy, otherwise it would be like the bottom we did
(one side high, another side low)

How to remove the gap between to planks (bottom and the first plank)
(long enough two woods, a cramp – put one inside attaching the bottom and the other one outside lying on the first plank – cramp smoothly, not until ding the bottom

Use white masking tape to make a reference of height of each frame which is already driving a fair line.

Use batten to make a fair line before beveling and draw a line on the other plank (topside)

Cramp a piece of wood with a frame for laying down planks

Adjust jigsaw angle or plane angle for working different angle of sawing or planing (transom, box and land and whole lot of use)

Most lines on the boat have to be fair. If it is not the drawing is wrong.

Couple of ways how to grab and stroke planes

Get rid of dust with using a flat thin wood striking on planks

The width between two skegs is good to be as wide as possible

How to remove the gap between the skegs and the bottom (usd wedges under the bottom between frames)

Cramp at the end of a skeg and nail wedges holding up in the middle of the skeg not to move much

Brass nail OK

Lump
Flush

Chris told and showed us box and land joint which is really detail and tricky one. I was sort of upset because I beveled the forward side of the first plank, which I shouldn’t have done that because it’s about ‘box and land joint’. Anyway, it didn’t matter.

Box and land joint
(land plane or rebate plane and chisel, faying surface line for reference)

If it can be accurate, work on the bench and fit in them. There was land plane having a bit of hollow blade and also now there is, but nowadays boat builders don’t use them much than before because of the invention of epoxy and a couple of reasons…(I didn’t understand at that moment Lance and Chris talking). Additionally, I made a small plank for my long board that I used off cuts of 12 mm plywood, cut it diagonally, glue them and nailed on them on the work bench.

2011년 11월 7일 월요일

07112011(the first planking)

Learning something everyday makes me happy but it is not easy. Boats on the first floor are getting a shape of boat made with strips and ours are getting there, it is a bit slower though. My task last week was making a stem. I was given a laminated stem on Moira’s boat, which is the one that we (B team) are building. Actually, I was one of guys laminated it. I remember the extra bits of wood laminated on the outside corner of it and it cracked a bit, finally it was gone by planing and sanding though. It is apparently made in a same way to the mid-ship laminated frames steamed in a steam gear or something. Firstly, I had to buzz it and used thicknesser, making it as thick as possible (no?), but end up exact thickness which is exact size of it. Then, I mark up some points on it through the drawing of stem detail. The one that I wasn’t totally familiar with was the bearding line which is a reference for beveling. I used a tick stick, a girly batten and a square. After marking details on 4 surfaces, I started planing. Prior to planing, I used router for rounding the inside of the stem and used face sander for the end of it making round. Beveling surface has to be flat, because it is faying surface. Chris always tell us not to touch the line. After that anyway, I fixed it on the bed lining up the F.P. and station 0 (bulkhead) with screwing on to the bed. It looks good so far. Today, Jun and I lofted the first planking. There are two curves looking not really one fair curve and we checked twice. I thought that it could be like that it was quite curvy though. Anyway, we left 10mm both sides and no worries about it. Lofting today was the same for the bottoms, but this plywood’s thickness was 6 mm, which is half of the bottom ones, and Chris said 60 mm was perfectly enough for glueing area instead of 75 mm. If it is too long it will be rolled up. It has to be avoided lining the scarphing line of the first planking and the top side. (Not ‘has to be’ but Chris said that it is not good.) It makes sense.


Laminating sequence (the bottom plywood)

Mid-ship frame and stem

Transom


Sawing skill for making lovely joints

Wedges under a piece of wood for more compressor in the middle

Taking beveling angles with bevel square on plywood

Same method for scarphing (with resin only, no powder – powder can’t be soaked easily into the fiber of wood, so it is better used for outside of wood or something)

Skeg (follow the line of the bottom, used straight edge for flat surface of skeg and round bit for the end of it)


Box land (???)


Spoke shape (wooden body for honing)

Be aware of grain direction when sawing (stroke the grain for one side you chose)


Spiling planking (used for lofting the first planking before transferring on the card board)

2011년 11월 1일 화요일

01112011(scaphing the bottoms)


We reached making the scarph joint of the bottoms using wedges pushing down up against the face of H-beam under the roof and a couple of screw on the plywood. The thickness of the bottom is 12mm of plywood, BS 1088 okume, and the scarph joint is 75mm. First, we drew the bottom plan and the transom one on a piece of cardboard then transferred on the plywood with using batten. We had to make sure get 75mm of faying surface for scarphing and let the plywood bigger enough than the exact size. We made two holes for being able to see the centre line to draw one half and another half after flipping over the cardboard. Jigsaw was used for this job and had to be aware of the proper direction of grain when using it. Before planning the scarph joint, we used small hand band sander (I don’t know the name) and finished by using plane. Making midship laminated frame and laminated stem, we used temporary frame on station 3 and 1:1 scale stem plan, respectively. Yesterday, we laminated both using epoxy (WEST system) made up with resin, hardener and powder (?). Chris showed us how to use them and mix them properly with an ice cream box, a small piece of wood for mixing and a wooden plate from rubbish bin for spreading them. Lately, we can’t do all of the things to do together because it is getting specialization so we can’t hear the explanation of Chris for all discipline. Sometimes, I have to explain what I was told from Chris to classmates but mostly I am hearing. We made sculps (I forgot the name…) which is for drainage at the bottom of the boat on the corner of the midship frames. We used the method of making 10 degrees for the transom incline, chipped out by using hand drill and chiseled on top of the bulkhead for fitting the stem in it, beveled by using a long batten running through each edge on each station. Chris showed us how to make a lovely joint with using cramps and handsaw when making half-lap joint or whatever and told us what the bearding line is which was a reference line on the stem plan for beveling. At the end of today, Tapu and I laminated another bits of wood on the round corners of the forward surface of the stem to fill the gap on them. During this job, one piece of wood had a small crack but we didn’t know if it was alright or not.


Kahikatea (white pine)

2011년 10월 30일 일요일

30102011(Marathon volunteering)


Three weeks flew away. From the time this vacation began, actually I was going to read books and do some extra study I couldn’t do during this term but I totally was like a stuffed pig and do nothing, has however thought about the way I am going to go. I sort of wasn’t pleasant because of rejection from some of boat builders I applied for a job, most of which hasn’t even replied me yet. It was my mistake that I thought my bachelor degree in naval architecture and two years period of my career in HHI could help me get a job as a boat builder. No way. The first thing I have to do is apparently improving my English at least I hope to find a job here in New Zealand. Except that thing, there is probably no difference between other guys and me in my class (my classmates are really nice and cool indeed though) or even in real world. Anyhow, I set my goal. During the holiday, there were rugby games and my wife and I watched all matches of the All blacks, quarter finals and semi-final as well. The final match between All blacks and France was really exciting that we couldn’t take our eyes off on the TV and move at all. All blacks has won the match. We bought a small reasonably good printer which is scanning, photocopy available with wireless signal away from home like if I ordered printing at Unitec by I-phone or something, it will take my signal and print automatically at home(cool~). Basically, we separated our duty of housekeeping that I do dishes and vacuuming, my wife cook food and mostly do laundry and the rest of them are randomly flexible choice of us. I suggested my wife to change this during the holidays so she did everything during her holiday and I did everything during my one. I realized I am not quite a good chef. My swim academy had a holiday class for 10 days but I got my time off because my ear canal inflammation that I used to have in Korea, it is getting better though. Looking around a couple of websites about yachts, boat builders and yacht communities, I kind of found my goal I mentioned above.

We volunteered for marathon held by Adidas today. Getting up 5 A.M which is unusual, we walked to Victoria Park and we could find Ashley who was our volunteering manager (?) from probably the heart corporation. Our duty was make sure the runners going through the finish line keep moving and not let them sit on the road because if someone starts to sit on the road it would be messy and not a good idea to stand up again which is really hard for them having run through 20 km or the full course. One thing I remember was I told someone tend to sitting on the road to keep moving but actually he was a blind runner with a guy helping him. I felt so sorry about that (hmm…. but did I have to? He was a real runner same as other guys or even better than others.) Anyway, It was really good experience for us, because I’m having harbor crossing two weeks later and I sort of pre-experienced about the festival like this. There were roughly 700 volunteers but I couldn’t see most of them and the idea of volunteering is helping the competitors concentrate on their way to go and their game. Actually, this game today was a massive one that I realized after the game finished. On the way to countdown, we came across Andrew and his wife (I forgot her name…). His wife was a runner today and he encouraged her when she left 7 km of her race, which is great.

2011년 10월 5일 수요일

06102011(reflection of this week)


I am having vacation for two weeks. We learned whole lot of things this week but I had no time to memo as it was teamwork and time is money, I just could not. This is the first time I build a boat. First, we chose a bed but actually we have to make it but there were few ones the other students had already used before. Our dory LOA is 3.491m but the bed is a bit shorter so we had to extend it. Bed has to be level and the surface of it has to be smooth. Strong enough to work on that will be good and make the height good to work. Make sure those conditions are ok, attach a block on the legs (inside is better, no stuck) and fix them on to the floor. It doesn’t have to be super accurate (width and length) and neat for making the bed because it is not a part of our vessel but I thought it would be better to make it more accurately. The accuracy may help or guide later. We fixed the string for centre line and it has to have tension like a bow string and must not be touched anywhere. We used an aluminum straight edge that we had used at lofting to mark each station on the bed with running measurement method and a square rule. Chris said the measuring has to be from F.P. Lance, Jibreel, Jun, Tapu, Stephen and me are our team and I think we are a good team.
Chris told us about spiling planking but I didn’t follow what it means. We lofted temporary frames of each station on the pieces of MDF which were used by former students and also lofted on new one as well. Some of frames were bigger than MDF so another piece of MDF was attached by PVA. We used plastic vinyl underneath MDF glueing but I thought cardboard was better to be used so that can breathe well. Anyway 3 hours was quite enough to smack them except the surface underneath (not a problem). We used table saw, band saw and disk sander. Spoles (I don’t know the spelling) were cut too thin to support the frames mounted so we laminated them 2 into 1 again to make thick. We had to make sure which position (forward and aft of the station line) the spoles have to be fixed especially Station 3 (still don’t know where to put it). We mounted all of them except station 3 because of making the laminated frame (I don’t know this name is correct). We set up two braces diagonally from station 2 to the bed and the other stations will be fixed by using small pieces of wood each other. Make sure the length between each station is same from the bottom of frames to anywhere of those ones (use level and check the frames plum). Each angle (chine or sheer) on the frames need lines for reference after bevel them or whatever, otherwise we lose exact size or point. Don, who was one of boat owners as a customer of Unitec, came to us and have a talk about what he liked and disliked about the boat he bought which was a sister of our boat. It was quite a good time for us because we have to communicate with boat owners and listen to their satisfaction and complain. (bulkhead hatch, coving, midship laminated frame, thwarts, painting and weight of paint, bung, rowlock chock, etc. Before lunchtime, we went to Marae which is a building represents the idea of mixture of Maori culture and Immigrants culture but to tell the truth I didn’t understand what they were saying. At the end of the class, we changed the blade of the bigger band saw downstairs.
Yesterday was the last day this term. We spent much time for making laminated midship frames, using buzzer, thicknesser, belt sander and band saw. It was quite hard to make them as thick as possible under 7mm and skimmed. We used a guide when using band saw because that was much easier and neater and used a piece of wood to prevent wobbling because they were too thin that the roller inside can easily make them banded. When using belt sander, we turned on suction switch to make them flat. I realized that even we are making temporary frames or whatever the more accurate, the shorter the time consuming at the end of the day. We heated the woods we dressed up about 20 minutes by using steam machine which is not pressurizing one. It takes about an hour and a half to heat it up and did good work on the woods. Chris said that prepare everything that we had to use like clamps or saw horse and blocks of wood because they lose heat in a few seconds. We have to bend them and clamp them as quick as possible.
I will read some books on this vacation. Weather is good today. There are so many things to do….

Think about
MDF (Medium density fibreboard)
Small blocks in the corner inside
Particle board
PVA (Polyvinyl Alcohol)
Capping (what is this?)
Grumpy
Clumsy
Screw angle
Principle of screw working
Coving
Quarter knees
Smack
Datum point, line, plane
Siding
Moulding
Bulkhead
Laminated midship frame
Surface development
Spiling planking
spile
Grain

What else....

2011년 9월 28일 수요일

28092011(Brainstorming)

Projection & actual

We started doing small craft building with brainstorming about Mark’s dory. We have not planned yet, but overall it has to take 5 weeks (15 days – 75 man hours). Starting from saying LOA(3.6m), we thought about what we needs to plan, construct and maintenance. Don, who was a real boat owner of the sister dory we are going to make, pop by our classroom and tell something like feedback that he want us to know. By the way, the program ‘Smart notebook’ is quite a good one for brainstorming and re-organising information.

- runners (Chris prefers to have two runners, because they help keep standing when a boat come out of water)
- planking
- rowlock chock
- filling
- housekeeping
- comiclife (a program for making stuffs into comic)
- team contract
- nesting
- fussy
- mahara (e-portfolio program)
- time lapse

28092011(day 3 – day skipper)

This morning, we had a review about what we learned this week and did plotting a course on the chart for Auckland Harbour coming in. I was confused to the depth with number on the chart, because didn’t know where the standard point of depth is. It was in the book though. Chart datum is it. Chris said that it is good to go fishing just after new moon. Tidal stream is faster between high tide and low tide.

- State of tide
- Dawning
- Midday
- Setting

2011년 9월 27일 화요일

27092011(day 2 - Day skipper)

We have left only the next week this term. Today, we had the second day of day skipper. It is mostly new for me that we learned. Lance and Andrew looks to be reasonably familiar with those terms and knowledge. Theoretical class is more difficult than having practical ones but I have to challenge it. I will look deeply into the book this weekend.

terms
- Underwater spout (a symbol looks like a fountain, representing underwater spout)
- overfall (like a cliff that got suddenly deep)
- priority of the right way (shark(kidding^^)>fishing boat>swimmer>rowing boat>yacht under sail>yacht under power>ship)
- sector light (red-unsafe and not good condition below the water/white-safe and good)
- leading light (red/white/green – keep your way in the white light section leading towards onshore)
- wash (marine term - broken wave)
- continual line (isobar line is one type of it)
- divider (similar to compass, handle by one hand to be designed available in freezing weather)
- battery is flat
- transverse Mercator projection
- isobar lines
- 1 degree = 60 nmile , 1 minute = 1 nmile
- spoiled ground (stuff dumped)
- Grinich observatory (which is on latitude 0)
- firth of thames (a name of firth in New Zealand) firth is similar to bay (difference?)
- bksh (a term on the chart - broken shell)
- tectonic
- fl (flash – we can figure out where we are by identifying different flash from different lighthouse)
- tie oneself with a rope and make sure you have a knife with you
- latitude east or west sth sth, longitude north or south sth, sth
- if you are in distress and radio a message, 1st let them know where you are then say something else
- H(high atmospheric pressure) = fine weather/ L(low atmospheric pressure) = rough weather
- H make the sea flat because the air push it, L make the sea free so that makes wave
- the gravity makes wave (I will look into this…from what I learned at university)
- swell
- it is good to make a slight angle towards the wave because the vessel can jump over waves easily and is better to be ready to run
- wharf ( quay, pier )
- warp ( twist )
- sound (measuring depth of fluid)
- full scale 1:1
- small-scale 1:1000000
- large-scale 1:50000
- protractor
- fishfarm
- at anchor
- motor sailing
- be aware of the mast being caught by electric wires when you move the vessel on the road
- ski lanes (orange and black stripe poles)
- when signaling SOS you can use your arms moving slow and deliberately
- EPIRB (emergency position indication radio beacon)
- RT (radiotelephone)
- essential safety stuffs - water, lifejacket, torch, hat, chart, handheld VHF, oar, rope, flare, knife, first aid kit, sunblock, GPS
- thimble
- bailer (a tool be used for getting the water out from the boat)
- longnose
- sandflies ( like mosquito but worse one)
- sounder
- bow line, clove hitch, anchor bend, stopper knot (kinds of how to tie a rope)
- list (a marine term meaning incline)
- lay an anchor
- man overboard!! (someone fell into water)
- running aground(stuck on the rock or seabed), capsize(lose stability and lie one side), sink(immerse) – all different but can be related to each other
- helm – like a wheel
- ground tackle (mooring stuffs)
- preferred channel
- point of interest
- cardinal mark – safe
- isolated danger mark – danger
- submerged cable (don’t anchor on it)
- cocked hat, plot course

2011년 9월 26일 월요일

26092011(day skipper - day 1)

We had the day skipper today. Brett was our day tutor and his pronounce is different from Chris’s. Getting used to Chris’s voice, I felt slightly harder to understand than Chris’s class. We got a book ‘Day Skipper Theory’ published by coastguard and have to get it back to school.

- The sidelights on the port side are red, whereas they are green on the starboard side.(an unbroken light from right ahead to 22.5 degree abaft the beam on its respective side.)
- Most of cases, boats have the right way to starboard.
- Usually, the boat having the wind on starboard has the right way (stand-on), except they are heading same direction.
- bearing through an object (relative velocity - use something fixed on board (ex. Stanchion))
- speed (under 5 knots 200m from shore)
- safety distance 50m (at least)
- an overtaking vessel
- a crossing vessel
- blue peter(a flag for indicating there are divers below it) - within 200m from it, speed down under 5 knots
- the right hand rule(?)
- rescue chopper
- leaving ramp(?)
- The tropic of Cancer
- The tropic of Capricorn
- oscillate
- latitudes (every one of them has different length)
- longitudes (every one of them has the same length – 10800 nmile) we can use this(y-axis) on the chart when we measure the distance between two spot
- New Zealand is in far east ocean because the sun rises earliest ( east 177 something)
- Mercator’s chart (extend the actual size of a slice on the sphere into a rectangular piece)
- horizon – about 7.5 nmile
- VHF (Very High Frequency) international channel - #16
- magnetic polar (slightly different from the due polar and changes every year with 6~8 year period, so map changes every year. If vessels don’t go far away from shore, ignore)
- geomagnetic coordinate system
- magnetic field variation
- deviation
- magnetic compass has to be isolated from electric or magnetic facilities (otherwise it malfunctions)
- engulf
- magnetic variation 19 degree E (variation east compass least – minus 19 from what compass says
- outhaul
- fire
- communication & navigation
- safety
- weather
- barnacle (sea acorn) – prevent them by using toxic paint on hull(still legal)
- anchoring is the best way to avoid further disaster when vessels are on an emergency situation and helps the vessels turn into wave
- turn into wave (more stable) – head sea > beam sea > quarter sea
- when a vessel jump over the crest and rush to the wave hallow, it is likely to be yawning which is very dangerous (lost manoeuvrablity), broaching
- a rope on the stern
- when outboard immersed one time, it would lost power
- when anchoring the vessel, it is not good of the sides towards shore
- 2 minutes form ( where you intend to go? where you launch from? People on boat? When plan to be back? Give to trusted person – contact info of boat party, registration number, contact details for local authorities, boat colour, boat name, size, etc.)
- distress signal (flare ex> red flare parachute)
- sailing on a port tack – give way
- sailing on a starboard tack – has the right of way
- windward boat – give way
- leeward boat – has the right of way
- neap tides VS spring tides
- datum plane
- chart datum – lowest part when low tides
- charted depth – always immersed
- drying height – (?)
- no wet
- wind (from), tidal stream (to)
- ship speed and tidal stream speed are given draw vector lines and assume the distance and the time
- lulls, gusts
- lake – sometimes the weather changes in an hour
- 3 by 5, 5 by 5 ( the clarity of the sensibility of VHF or something)
- channel #16 (call up channel, emergency channel)
- the actual condition is prevailing (?)
- not a problem

It was really hard class for me to follow, because the things that we learned today were mostly in high school (or college) and they are quite hard to be understood with the second language. There were heaps stuffs(mostly details) but I didn’t get much of them. Bugger…With hindsight, I should have had sailing before.

2011년 9월 21일 수요일

21092011(AutoCAD-small assessment)

terms
Coving
Biased
Flange(coupling, shaft)

commands
F3 shortcut
F5 toggle
F8 ortho mode on/off
Iso mode(On snap ->setting ->snap and grid ->Isometric snap
Oblique view
Paper space/model space
Background
Z+enter, E+enter, W+enter
Array(polar, rectangular)
TDC(Top dead centre)
Multi viewport

We have finished AutoCAD session today, have to mark up the drawings we did though. It was good time to learn and remind doing AutoCAD this week. Every AutoCAD user has different tastes, so the more I look how the tutor draws, the more I learn. Even though having pre-experience of AutoCAD, I had almost same problems with other mates. What I felt through last week and this week is my English skill is too weak even I was confident to my listening when I wasn't really into this environment here. What should I do...What I really want to learn is the tiny points which are not common knowledge that Chris or other tutors are saying, but I can't hear that. Writing and speaking? I don't know what to say.


Isometric view and oblique view are different. I think oblique view has one surface that is on the same surface where it is drawn and two other surfaces are looked oblique as compared to Isometric view. We can draw Isometrice view by changing into Iso snap from rectangular snap.

This is a drawing of a flange using array and divide commands.


Temporary frame - drawing chine and gunwale deduction


doubler, through hole inside - I have to understand the concept of this and should have measured all measurements by scale rule. It would be easy to know how they are working.

building jig - mirror

We handed our small assessments but I have to mark them up by next monday. Heaps of mistakes on them! I will look into the book 'small craft and safety' because we are having day skipper next week.

ship resistance(introduction)


2011년 9월 19일 월요일

ship(propulsion design-introduction)


19092011(Autocad-stem detail, transom development)

We did Autocad today as we did last week. Drawing stem detail including stem bevel and transom development, we had a time learning view port function and view point function with Brett. That was good to know that it is useful and necessary for organising each piece of drawing on the layers into one or more drawing sheets. The class today was mainly the time for self-studying for us. Here are new terms~

flat out(it's an idiom from I listened to Brett)
default
TTR(tangential tangential radius)-one method of making a circle
one to one(1:1)
li(for a command 'list')
layer lock&off are different(be aware of using these properly)
tools->user preferences
information that tutors give us(could prefix our knowledge but it is easy to find a way getting there)
self development(rough information)
challenge knowledge(good)
challenge person(up to you)
format->point

18092011(Auckland International boat show)

Yesterday, my wife and I went to the boat show. There were heaps of boats as usual in Auckland and were massive superyachts as well. This was a bit similar of ones held in Korea, but overall this one here is miles more huge(in terms of everything) than that of Korea. We paid $20 per each for a day pass. Prior to going there, we prepared our lunch naming Ghim-bob(sea weed roll). Yummy~This is it, see below.

Three big boats attracted spectator's attention at first near the entry. One of them is COMO made by Alloy yachts. Two other ones were Thalia, Drumbeg made by Vitters shipyards in Holland. These are them.


 I couldn't take the picture of their bow because they all looking towards the ocean. They looked nice though. Just before crossing the bascule bridge, we saw another one made by Alloy yachts, which name was Jenice of Wyoming.


I always feel good when seeing a mast up in the air. Finding two huge masts are standing far beyond the park near at the end of the harbour that I reckon, we walked to there through the bridge. We saw really big boats there. One was Elandess made by Heesen yachts in Holland and another one was Vertigo which is the last sail boat from Alloy yacht so far, but we didn't see the whole body of it because the other yacht was infront of it.
 Elandess
the transom of Vertigo
masts of Vertigo

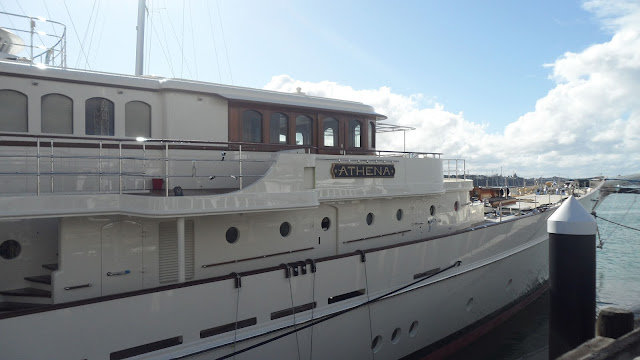
The last one was Athena that screened Vertigo, which is made by Royal Huisman in Holland. She has been undergoing a refit at Orams Marine Service so the three masts of her were taked off somewhere near there(I saw a picture on the website.). She was really gorgeous even she got rid of them. Believe or not, she will go to Antarctica for travelling and now is on a painting. I wish I could make the one like that before I die.

 figurehead
 no masts! she used to have three!
There was one more yacht(cruise?) on the other side of the quay. She was Kestrel which had sailed over 1 centry. She was built in 1905!


 Two booths were in the boat show, which have many small booths of ship equipment company, material company, small shipyards and so on.

CCTV?

 heaps of yachts~
 after coming back home anniversery shot! Auckland International boat show as well as Ghim-bob~